Appearance
Rebuilding a Best Practice Virtual Machine
DraftFriday
Prepare for rebuild
Tuesday
Upgrade hypervisor to XCP-NG
Wednesday
Upgrade VM to newer Windows Server version
Thursday
Install previous software
2
Stop and disable services that could be providing results, referrals, research data, or any other medical or marketing software
TIP
Common software to be stopped includes, but is not limited to
| Service name | Service provided | Company |
|---|---|---|
| mqscheduler | Pathology | Medway |
| FetchDaemon | Pathology | Sonic Healthcare |
| CAPRICORN | Referrals | Medical Objects |
| Isaac Connector | App functions | Medinet |
| Automed Launcher | Just about everything | Automed Systems |
3
Take a backup of the BP database on the old VM
Picture guide
.C9yB8g1X.png)
.DeIrCakj.png)
Ensure that "Complete backup" is selected ._1VnyUQS.png)
Ensure that "Uncompressed file" is selected .CT-ddCX7.png)
If you have enough space on the hypervisor, you can create a temporary migration disk to hold the BP backup
.5C_tB7gR.png)
Ensure that the size is at minimum the size of the existing database .CLgevfcp.png)
.DLV5Czbp.png)
You may wish to name this disk, to ensure its purpose is known .clbWWSFP.png)
4
While the BP database is backing up, prepare the new VM to accept the database
Increase the storage attached and expand the C drive of the new VM
Picture guide
.DlPA_T0U.png)
DANGER
If you have a recovery partition, as pictured below .DD9pmrcb.png)
Perform these steps to remove the recovery partition
cmd
reagentc /disable
diskpart
list disk
select disk <x>
list part
select part <y>
delete
Replace <x> with the number corresponding to the main disk, typically this will be 0
Replace <y> with the number corresponding to the recovery partition, highlighted below 
.CbmZl9_V.png)
.TtCwddAf.png)
Update the hostname to the format XXXX-SRV-BP-01 (XXXX being the )
Picture guide
.Qgxj6vCy.png)
Add the new VM to the Myhealth - SRV TeamViewer group
Picture guide
.Dw27eGqC.png)
.LenRqbBR.png)
.CHIP2tLz.png)
Enable the Myhealth IT scheduled tasks
Picture guide
.DNWc6uQS.png)
If an SQL Server license is required, activate it
Picture guide
.BrJpPtQT.png)
.BJfRNXDb.png)
.DdhRzHYg.png)
5
Power off the old VM, and increase the memory allocated to the new VM to 24GB minimum
.E-EivLeI.png)
WARNING
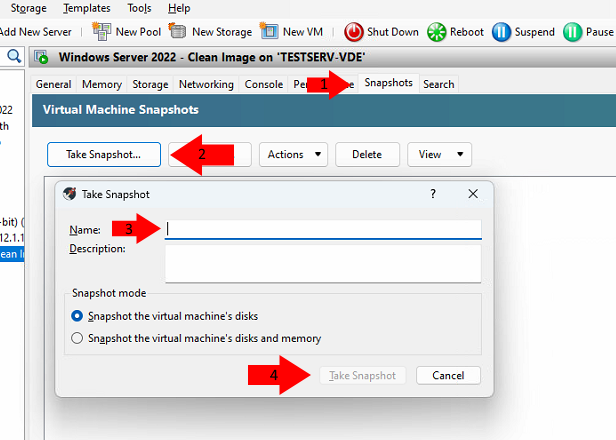
Take a snapshot, now that all the basic setup is done - name it "Pre-restore"
.CJLXLWpe.png)
.D56sA16c.png)
.D1CE224S.png)
.CjllR_XK.png)
Video guide
WIP